Translate

    jueves, 14 de julio de 2016


    Category: articles

    sábado, 14 de noviembre de 2015


    A few days ago I been working on a project of how to use IBM Bluemix Push service with phonegap and I found pretty hard to figure it out how to do it, so I decided to make this post for others like me who are struggling with it, so here you go, a step by step guide of how to configure Bluemix Push notifications with Phongap

    NOTE: this tutorial does not explain how to create a bluemix account

    Go to bluemix and sign in


    The first step will be create a app. Go to DASHBOARD tab and click on the Create APP button


    Choose Web app type


    I choosed APS .NET 5 just because I like .NET :P


    Press Continue button


    Type the name you like and press FINISH


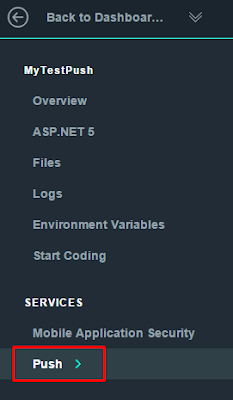
    Then just wait the app creation process to complete, the we should add the requiered services, I will show you how. Click on Overview in the left menu and the on ADD A SERVICE OR API


    Bluemix push notifications require tow services to work Mobile Application Security and Push. The Mobile Application Security should be added before Push otherwise you will get and error when adding Push

    Search for the Push service shown below in the Mobile category


    After clicking on Mobile Application Security give it a name you like or just leave the suggested value, then hit Create button


    After creation we will be promted to restage our app, but we will do this after adding the Push service so press Cancel for now


    Then go back to Overview and click on ADD A SERVICE OR API again but click on Push service this time, give it the name you like and hit create. Now Restage the app to get our services up and running


    Now, we have our sevices up and running, lets set the Cloud Messaging for Android credentials

    Note: If you need help creating your google api credentials you can use follow this tutorial
    Select Push service


    In the Configuration tab press Edit button under Google Cloud Messaging


    Fill in the form with the google api info


    Now, Bluemix back-end is all set, lets build the phonegap part

    Note: If you need to learn how to install phonegap you can follow this usefull phonegap install tutorial on windows
    First of all, lest create a simple phonegap project

    $ phonegap create hello com.example.hello HelloWorld


    as you will see, phonegap have just created a new project inside the hello directory


    move your working directory to hello with the $ cd hello command, after that use the following command to add a new platform to the project (android in this case)

    $ phonegap platform add android@3.6.4

    You should get something like this


    For this part we need to use the bluemix push phonegap plugins, lets download them

    $ phonegap plugin add https://hub.jazz.net/git/bluemixmobilesdk/ibmbluemix-cordova
    phonegap plugin add https://hub.jazz.net/git/bluemixmobilesdk/ibmpush-cordova

    NOTE: Take care of the plugins instalation order or you may get some weird errors like IBMLogger is not defined I also recommend using git url insted package name so you can get version 1.0.0-20150720-1718 instead of 1.0.0-20140625-1909 to avoid some troubles I ran into
    Now we can add our push regitration js code. Open index.js located inside <path to project>/<project name>/www/js/


    and replace all the app object with the following

    var app = {
        // Application Constructor
        initialize: function() {
            this.bindEvents();
        },
        // Bind Event Listeners
        //
        // Bind any events that are required on startup. Common events are:
        // 'load', 'deviceready', 'offline', and 'online'.
        bindEvents: function() {
            document.addEventListener('deviceready', this.onDeviceReady, false);
    
        },
        // deviceready Event Handler
        //
        // The scope of 'this' is the event. In order to call the 'receivedEvent'
        // function, we must explicity call 'app.receivedEvent(...);'
        onDeviceReady: function() {
            app.bluemixpush();
        },
        alertNotification: function(message) {
    
            IBMBluemix.getLogger().info("Received notification");
            alert(JSON.stringify(message));
        },
        bluemixpush: function() {
            console.log("device is ready, let's initialize bluemix!");
            var values = {
                applicationId: "<INSERT_APPLICATION_ID_HERE>",
                applicationSecret: "<INSERT_APPLICATION_SECRET_HERE>",
                applicationRoute: "<INSERT_APPLICATION_ROUTE_HERE>"
            };
            IBMBluemix.initialize(values).then(function() {
    
                return IBMPush.initializeService();
            }).then(function(pushObj) {
    
                pushObj.registerDevice("CordovaTest", "SampleTester", "app.alertNotification").done(function(response) {
                    IBMBluemix.getLogger().info("Device successfully registered: " + response);
                }, function(err) {
                    IBMBluemix.getLogger().error("ERROR REGISTERING DEVICE!:" + err);
                });
            }).catch(function(err) {
    
                IBMBluemix.getLogger().error("Error initializing the Push SDK or registering device: " + err);
            });
        }
    };


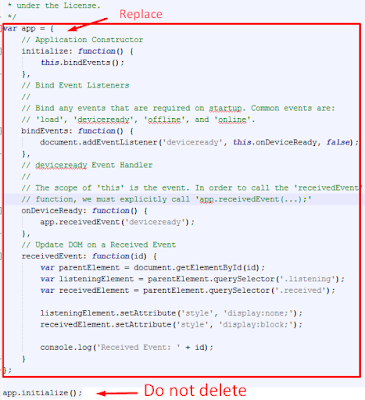
    NOTE: Be careful of not deleting the app.initialize() instruction at the bottom of your javascript file if you have it, but don't worry if you don't, it should be at the bottom of the index.html
    Or maybe is here


    Go back again to bluemix and click on Mobile Application Security service menu to obtain the applicationId and applicationSecret


    The applicationRoute values can be found here


    now lets test our code. You can use this command to deploy the app on your device (first check if you already got the drivers installed and usb debugging enabled) then use

    $ phonegap build

    and then

    $ phonegap run android --device

    Troubleshoot: check if your device is connected and reconized using adb.exe located in %USERPROFILE%\AppData\Local\Android\android-sdk\platform-tools and the command adb devices

     You should get something like this


    Everything should be working now and our device must be registed at bluemix, lets check that out. Go to https://console.ng.bluemix.net and click on DASHBOARD 


    select the app we created


    then click on the Push service


    and you should see the device id under de Registrations tab


    TIP: At the time of this post was made IBM Bluemix JS SDK is not to be the component that must be used to subscribe a device for Bluemix push notifications, see this comment
    TIP: Here are some phonegap plugins docs where you can find the ibmblumix and ibmpush info filtering by "ibm"
    TIP: Here is some bluemix hybrid app documentation (PhoneGap)
    TIP:  Here is a working project I based on

    I really hope this helps you so please leave your comments or/and suggestions. Se you later


    Category: articles

    miércoles, 11 de noviembre de 2015

    Hi guys, today I bring you an extremaly usefull tutorial, an step by step tutorial how to enable Google push notification service (Cloud Messagin for Android), this is pretty easy.

    First thing to do is go to developers console


    Then create a new project


    Type the project name and hit Create button


    After creation, lets enable the push API, click on Enable and manage APIs


    Click on Cloud Messaging for Android API


    Click on Enable

    Now lets add some API credentials. Click on Credentials on the left panel


    Choose the type of key you need, for this case we select API key


    Then we are promted to pick the platform tha will use the api key we are creating, because I'm sending my push through a third party provider I'll choose server key


    Set the name you want for your key and press Create

     Now we got the API key we need


    I hope this help you, comment please ;)


    Category: articles

    lunes, 19 de octubre de 2015

    A few days ago I had to use phonegap to make a mobile app, so I started from the beginning: Installation. I was hoping to find a next-next wizard who did the job for me pretty easy but I couldn't find it, so this was the plan B:
    There are a few simple requirements you'll need prior to installing the PhoneGap CLI:
    • node.js - is a JavaScript runtime to build your JavaScript code

    Category: articles

    domingo, 18 de octubre de 2015


    In the software development world, many cool frameworks and libraries like maven or Andrioid needs the Java JDK to work. If you move in this world you probably already have it or certainly will, so this installation tutorial will come usefull for you.

    Java JDK installation is pretty simple and straight forward first thing you need to do is go to Java SE Download Page and select the Java Platform option:


    Accept terms and select the option tha fits your OS

    Category: articles

    martes, 25 de agosto de 2015

    Some time ago, I was working on a project which used Kendo MVC Wrappers, they are pretty handy beacause they save you a lot of work with ajax call, formating, ordering, paging, among others, but many times I found myself struggling deep inside Telerik documentation trying to find out how to make something a little bit different from Telerik's Demos

    A few weeks ago, I needed to make a table grid who included a field from a foreign table that I accessed through a navigation property. I had to present to user a list of app comments with the following fields:
    • CommentId
    • Comment
    • Application (This is taken from a other)
    @(Html.Kendo().Grid()
     .Name("grid")
     .Pageable()
     .Sortable()
     .Filterable()
      .DataSource(dataSource => dataSource
      .Ajax()
      .Read(read => read
       .Action("GetAll", "Comment")
      )
     ).Columns(col =>
     {
      col.Bound(p => p.CommentId).Title("ID").Width(60);
      col.Bound(p => p.Text).Title("Comment");
      //foreign table field
      col.Bound(p => p.AppName).Title("App");
     })
     .Filterable(x => x.Enabled(false))
    )


    Category: articles

    jueves, 4 de junio de 2015

    In this tutorial I will show you how to install maven on windows, configure required environment variables and how to test if the install was done correctly

    Go to maven download page descargar maven and select de .zip file:


    Unzip the downloaded file wherever you want, in my case, drive e:\


    Category: articles